New Year, New Rope
How to take care of your rope across its entire lifespan.
So, you are the proud new owner of a rope huh? Well break that puppy out of the packaging and go get gripped on some spicy 5.6 trad! Actually, on second thought, maybe pump the brakes on cracking that bad boy open so that we can go over the responsibilities of owning and operating a rope first. There are a few little details about having a rope that don’t always get passed on to new climbers, and you might end up like my younger self and totally botch your first unpackaging ceremony.
What to Do Right Out of the Package
‘Ceremoniously’ is a good word for how you should unpackage your rope. This is the first thing we will touch on for new rope owners, since it is one of the most important details, and doesn’t normally come with instructions on the packaging. As many a seasoned vet will tell you: unpackaging, or rather uncoiling, your rope the wrong way is one of the easiest ways to give yourself an aneurysm and an hour or so of extra work. Ropes coming from the factory are fresh and stiff, and often coiled in a series of loops that, if simply released from their binding straps all at once, will result in a tangled and kinked mess. If you make this mistake, you will need to spend a good hour or so running a pigtail-ed rope through a belay device or carabiner to straighten out all the twists and turns.
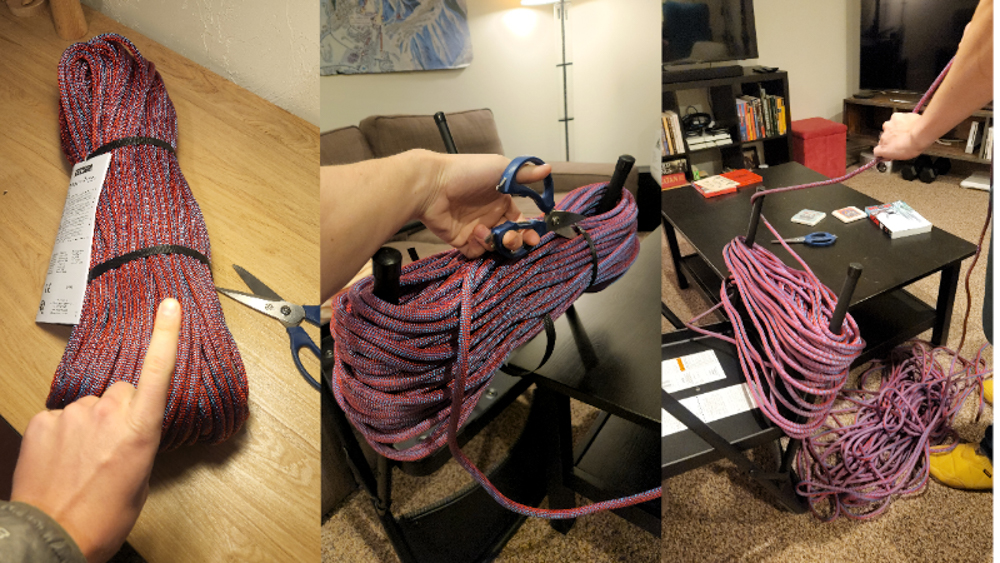
So how does one avoid this process? Well the ceremony for prepping a new rope out of the packaging looks a little different depending on which factory it came from and how it was coiled there. Some ropes may even say on the packaging, “climb-ready coiled” but I honestly wouldn’t trust that statement much given what the alternative is. The important principle to follow when unraveling your coil is to not undo all of the wraps of the rope all at once, and instead to unwind it loop by loop, and ideally under some sort of tension. This often looks like sticking your arms through the interior ends of a looped coil, and rolling the whole coil around to undo each loop of rope one at a time. Ideally you have a friend there to help you, but you can always get creative if you are by yourself. Some ropes come in packaging with a hole in it and directions to pull the coils out through the hole to properly unravel it. This is a great system, but often the wimpy paper packaging will tear and it is best to reinforce the hole with some duct tape.
Proper Storage
Once your rope is carefully uncoiled you can start using it, but the care doesn’t stop there! While using your rope, it is helpful to keep it out of the dirt as much as possible. For this, most people turn to rope bags and rope tarps. Rope bags help keep you organized at home and haul your rope to the crag, while rope tarps help keep your rope out of the dirt and allows you to quickly drag the rope between nearby routes. The best rope bags come with rope tarps built in, and I would always recommend these styles, although it is not uncommon to see people using Ikea bags or large grocery totes as simple, effective alternatives to expensive rope bags. Whatever you use, if it contains the rope well you can easily arrange the rope in a random pile often called an “open” or “pancake” flake for easy unraveling and use while climbing.
Proper Coiling
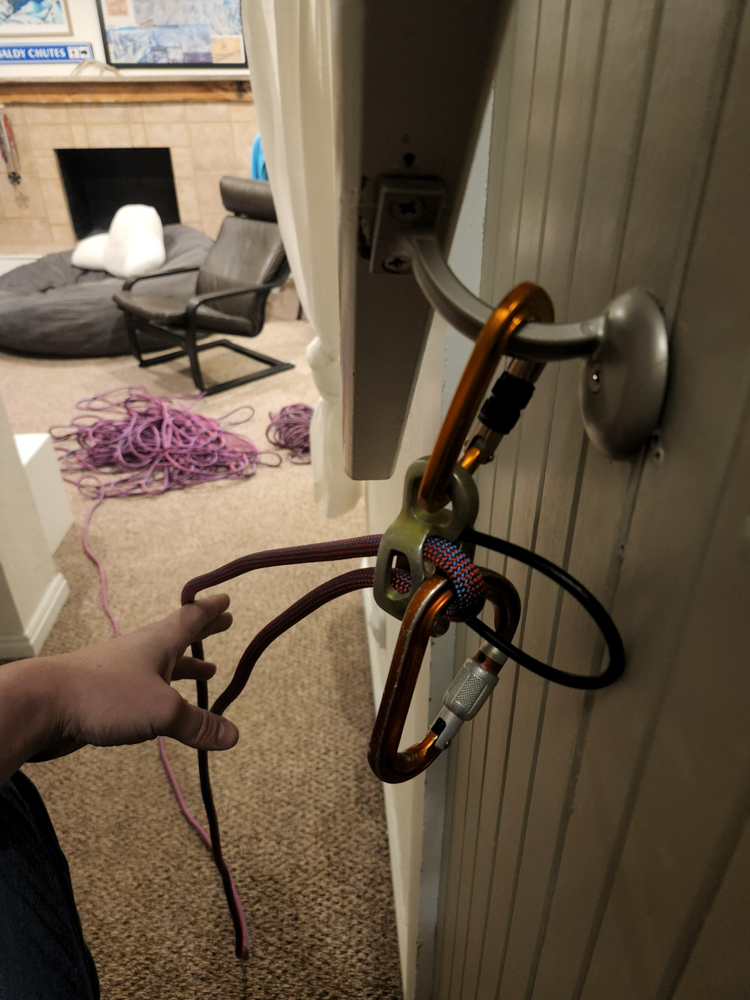
When you are not carrying your rope around in a loose pile, constrained by a rope bag or laundry basket, you should learn how to effectively coil your rope. Coiling your rope is important to prevent knots from developing in the system, as well as keeping things organized and away from snagging branches on the hike into your climb. There are many ways to coil your rope, and I won’t go into the details of all of them, but the one bit of rope coiling elitism I will try to infect you with is to coil from end-to-end, and not doubling the rope over in your coils. This difference is not totally critical and might fall under the same inconsequential umbrella as the gates-in vs. gates-out debate, but I would call myself an objective proponent of the former. (Aside: gates-out is the only true way). Coiling end-to-end with your ropes makes the most sense, since that is how you will use your rope when climbing. It is not often you get to the base of the climb and need to start with the middle of your rope, and coiling with the rope doubled over means you will have to re-organize your rope to avoid likely tangles while climbing. The only real advantage to a doubled over coil is the ability to create a “rope-backpack”, but these are rarely your only option for carrying your rope, and probably not the most comfortable anyways. It’s hard to convey my rant about coil semantics in writing, and it is certainly not the most critical part of rope care, but the one take-away you should have is that a well organized and thoughtful coiling method is the best way to store your rope or carry it around without a designated rope-bag. Heck, you could probably work some coil-practice into your shoulder workout routine and get real good at it!
Rope Upkeep
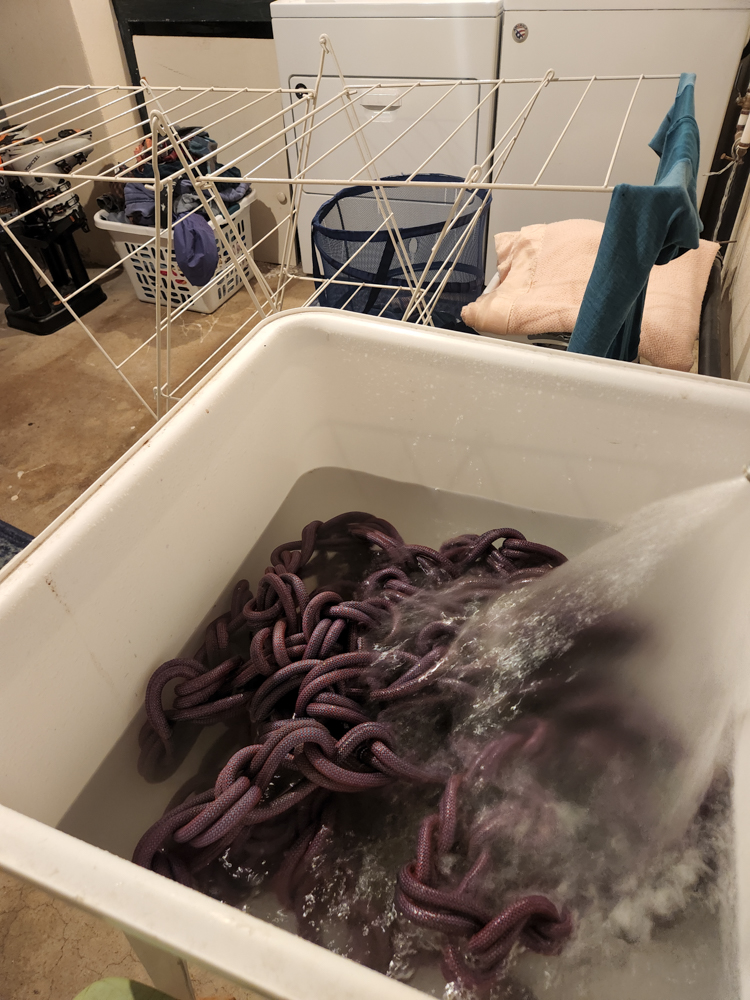
As you mature in your rope ownership, you may realize that your rope has aged as well, and could probably use a bath at this point. Keeping your rope clean helps extend its lifespan and should start with best practices to keep it out of dirt at the crag, but the intimidating cleaning process will eventually have to be utilized. Full disclosure, I don’t wash my ropes enough, and anyone who says they do is probably lying. But while this chore may seem scary, it really shouldn’t be. Step one is to fill your bathtub or similar container with clean water, ensuring this environment is free from residual chemicals. Step two is to simply swish your rope around in this water, gently “massaging” the dirt out of it. This can be done in clean water, or for added cleanliness you can try an extremely gentle soap. Dawn ultra gentle soaps work fine for this, but let’s be honest, you are terrified of your rope horrifically dissolving during this process, so you might as well spend the $5 or so to buy the special magic rope-soap from a climbing gear manufacturer. Sterling Rope Wash and Beal Rope-cleaner are great options for this. Once the rope has had its nice soak it’s very important to dry it thoroughly and without a heat source. The best way to do this is to daisy-chain the rope in a series of slipknots, and drape the whole length of it across your laundry rack or a handrail. Don’t just leave your rope in a sad pile like the laundry you haven’t folded in three days, make sure it hangs out to dry completely to avoid damaging mold and mildew.
The Final Word
Proper unpackaging, storage, coiling, and cleaning will help keep your rope running smooth, tangle free, and stronger for longer. With all of this in mind, you are ready to take care of your rope for its entire lifespan so that it takes care of you on the wall.
About the Gear Tester

Evan Watts
Evan grew up in the small hometown of Boring, Oregon, where he cut his teeth hiking and backpacking in the local Cascades. He now enjoys ice climbing, backcountry skiing, and trail running around in the Western States, and manages to fight off permanent employment despite an environmental engineering degree and perturbed parents.
- Evan Watts

- Evan Watts

- Evan Watts

- Evan Watts

- Evan Watts

- Evan Watts

- Evan Watts

- Evan Watts
- Evan Watts
- Evan Watts
- Evan Watts

- Evan Watts

- Evan Watts

- Evan Watts

- Evan Watts

- Evan Watts
- Evan Watts
- Evan Watts
What factors do you prioritize when selecting a new climbing rope, and how do you ensure it meets your safety and performance needs?
Hey Matt,
To start with the second part of your question, most of the safety/performance standards of a rope are unfortunately unable to be really tested without destroying the rope, so you just have to trust the manufacturer and go with their described features that you need from that rope. Thankfully, I haven’t heard of any dodgy rope manufacturers within the climbing world, so they can all be trusted. The one thing I do like to have on my ropes is the Unicore technology used by Beal/Edelweiss, which greatly improves rope safety when abrasion issues arise.
Secondly, the factors/features I prioritize varies greatly depending on what sport I am going to use the rope for. For alpine/ice climbing I prioritize ropes with low weight and superb dry treatments. For desert cragging I wouldn’t care so much about those features, and instead go for something with a thicker sheath to improve durability and a longer length to access more routes/rappels. Unfortunately there is no “do-it-all” rope, so the question of which features to prioritize really comes down to intended usage. For most folks just looking to get a first rope and go out cragging with it, I’d say looking for 9.3-10.0mm rope with 70m length will get the job done well. And always pick a pretty color for photos!