Climbing Anchors 101
Welcome to a quick guide on beginner climbing anchors! In the interest of protecting myself from vicious criticism, I will preface this guide by saying that climbing is an inherently dangerous sport and folks should always seek qualified guidance when learning new things. For some, this might mean finding a friend/mentor who knows what they are doing, others might take a class through their local gym or better yet an accredited climbing guide service, and certainly more than a few people will just use books or the internet to learn and practice the skills on their own. Either way you go about it, getting hands-on practice building anchors before you have to do so in a more serious environment is super important. Please don’t use this guide without hands-on practice! I am also certainly not the first person to put such information on the internet nor the most qualified, but I do think this serves a purpose in adding to the multitude of avenues making information more accessible to people looking to enter the sport.
With that bit of ass-covering out of the way I can get on to introducing the basic anchor systems. In this guide you will learn the basic principles behind climbing anchors and the more common ways to create climbing anchors. I tried to cut things down to just the essential, but learning these things does require some background and theory as to why we do what we do.To be honest, if this write-up was just where to tie the knots in your anchor and clip your carabiners we would be done in a paragraph or two, however I firmly believe that creating good anchors requires not only knowing the how but also why you are doing these things. Adding this knowledge to your mental toolbox will help you to make safe and efficient anchors that will build a strong foundation and lead into more advanced systems later in your climbing career.
For the purpose of simplifying things, I will assume that everyone reading this knows how to tie a figure-eight knot and inspect it to make sure it has been tied correctly. There are other knots you can use in making basic anchors, but this one will always do the trick and be relatively easy to untie after use.
Acronyms
Anyone who has taken an anchor building or climbing class has probably run into some sort of acronym to help them remember specific anchor qualities to look for. Some folks like SERENE, I had the simpler RENE for my acronym. SERENE includes Safe, Efficient, Redundant, Equalized, and No Extension. RENE doesn’t include Safe and Efficient likely because those two qualities in anchors are mostly relevant when creating gear anchors or ice anchors for more advanced systems and for the intro climber who is just clipping bolts RENE is a simpler system to try to remember. That doesn’t mean you can make unsafe or inefficient anchors, but for the meat and potatoes of creating our anchor systems, let’s just focus on RENE.
Redundant
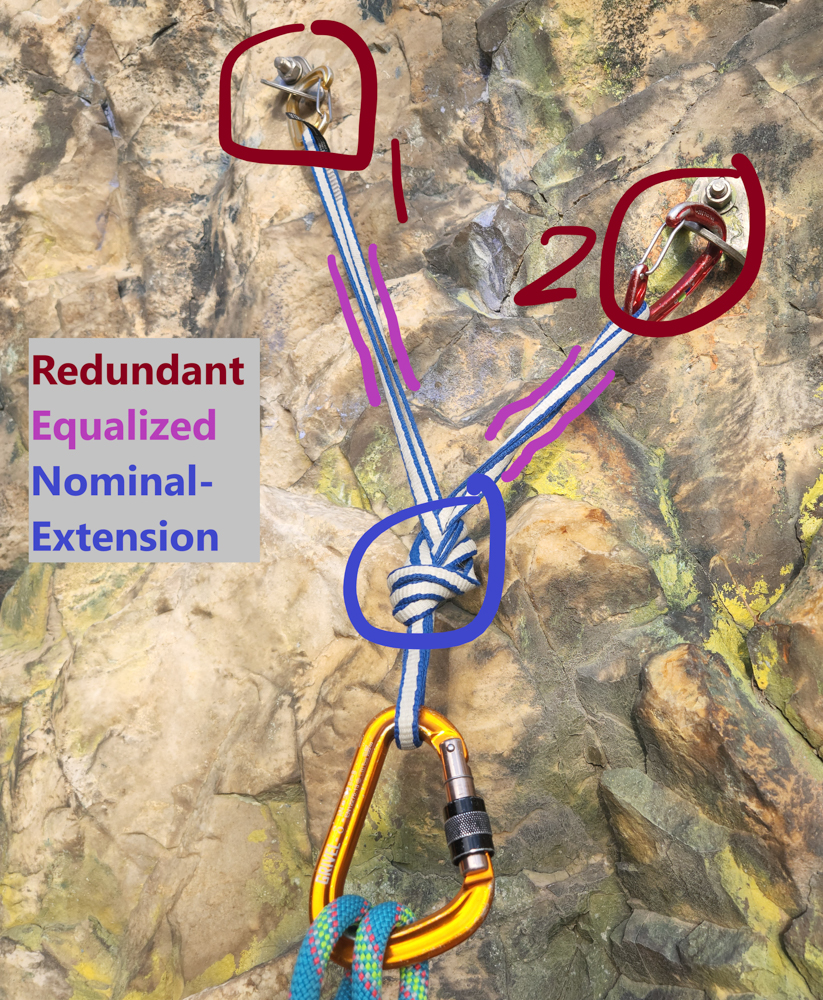
Redundant is the first part of our anchor acronym, and it’s a very important part. When climbing, we rely on redundancies in our systems to prevent something catastrophic happening should our primary source of safety fail. When rappelling, lowering, or just swapping gear at our belay, the anchor is our only point of connection to the wall, so we need to make sure that any anchor we build has redundancies built into it. For the simple anchors we are introducing in this article, we will assume that means there are two points of connection to the wall (likely bolts), meaning any anchor we build needs to connect to both points and crucially, should either of those points fail, the anchor will need to maintain its connection to the remaining point. I will often refer to this principle as an anchor having two “legs”.
Equalized
Equalized is the next step in the acronym, and builds directly off of our two redundant connections. Since our anchors could be exposed to dynamic forces when a fall occurs, we need to make sure that the weight is distributed as evenly as possible between the two points of connection. This looks different for our various anchor styles, but the principle of keeping the weight even between the two points helps prevent one from doing all the work. Modern anchor doctrine has evolved to understand that true equalization is more or less impossible, but that is something better addressed in a more advanced article and for now we should strive to get things as even as possible. In practice, this means that both legs of our anchor are tight when the anchor is loaded in the expected direction of force.
No Extension
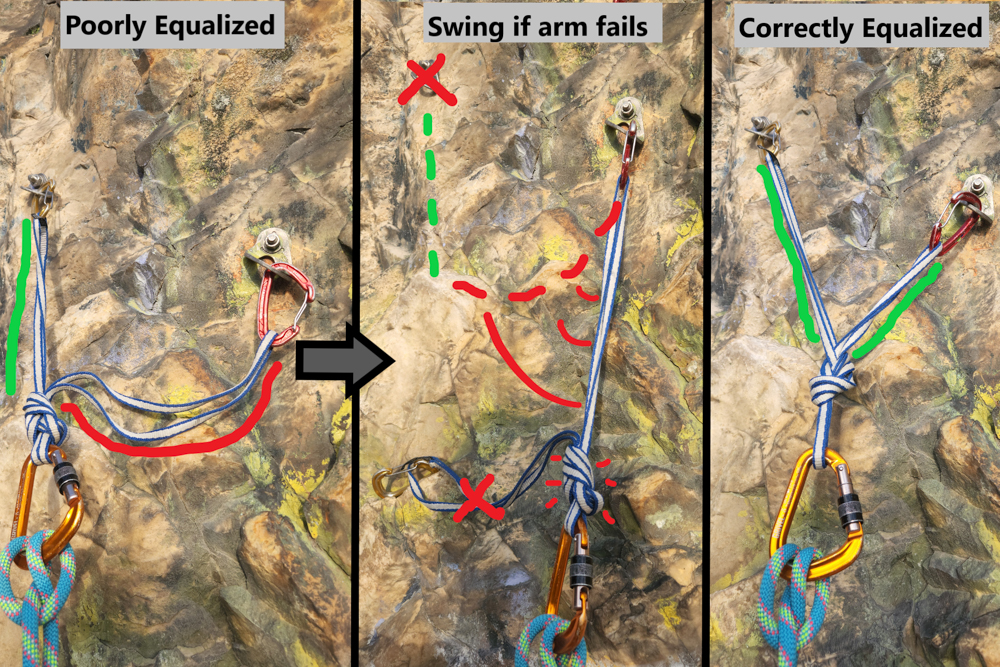
No extension, or better named “Nominal Extension”, is the final step in our anchor process and like the others it builds upon its predecessor. Within an equalized and redundant anchor there is still the opportunity for one of the legs to fail, and should this happen the point of force on the anchor will shift from a center point equalized between the two legs, to entirely loaded on the remaining leg. This distance in the shift of loading point allows the system to accelerate and increase the force applied when it stops upon reaching the new loading point, and reducing this length/time of acceleration is critical for lowering the stress on the remaining leg. Nominal extension is a better name than “No” extension, since in any system that distributes the weight between two points there will be some limited amount of extension no matter how close things get. The important part is that should one of the legs fail the change between the equalized state of the anchor to the singular remaining point is reduced as much as possible.
With those four qualities in mind, anchor building can take on many forms. Of course, the Safe and Efficient part of the SERENE acronym is still important. You should try to be efficient with your anchors by limiting the amount of gear used in them to the necessities, and safety in your anchors can take on many forms such as placing them in safe locations away from loose rock or other climbing parties.
More Universal Principles
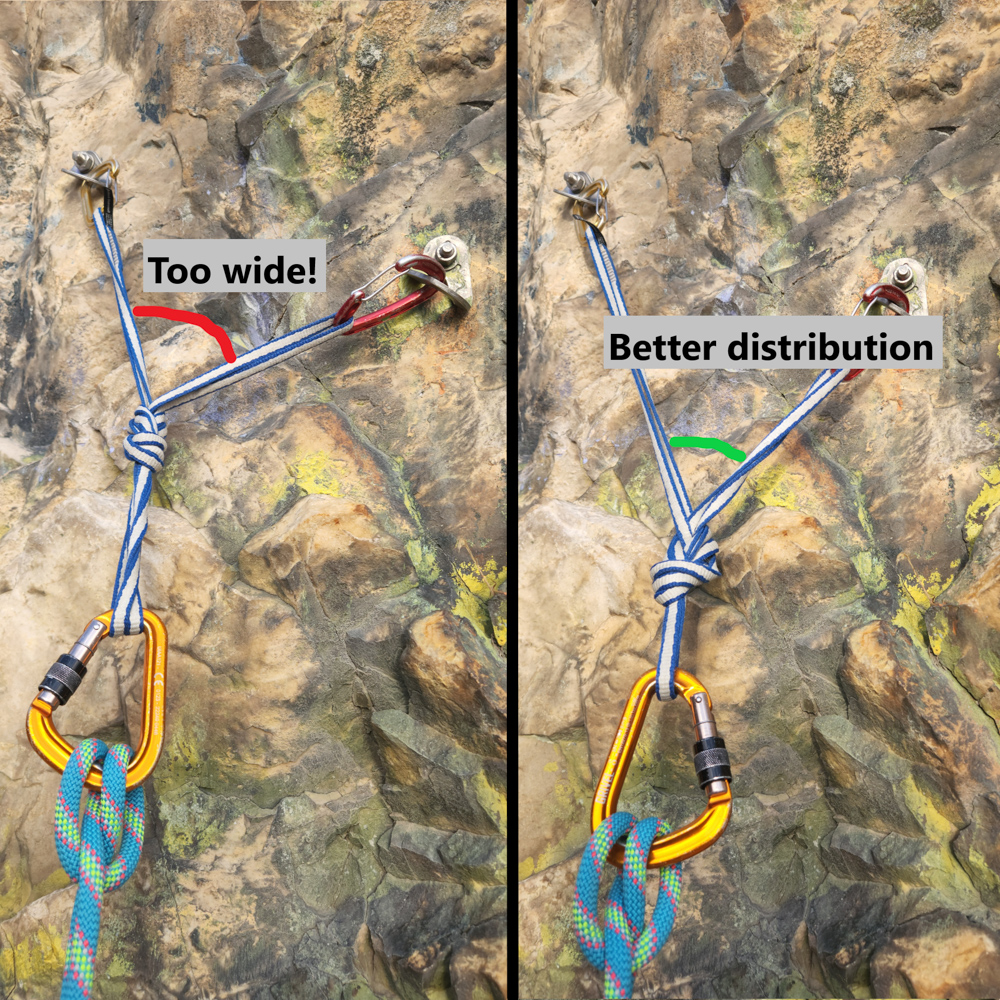
There are a few more important principles to remember when creating your anchor systems, regardless of which anchor style you choose to use. First, and probably most notorious, is the occurrence of the aptly named “American death triangles”. Maybe this term isn’t used much anymore, but when I was learning to climb it was hammered into me to watch how wide the angle was between the two legs of my anchor. Without going too deep into the trigonometry of things, the wider the angle between any legs of an anchor the more force is applied to each leg of the anchor. The reason this is called the “American” death triangle principle is that, for whatever reason, as bolting in the United States was being developed bolts were often placed side by side at stations while European practice was to place bolts above and below each other. The vertically stacked bolts of the European method negated the possibility of harmful trigonometry, and is certainly the superior method if the rock allows. Modern bolting practices tend to appreciate this fact, but it is still important to watch how wide your anchor is getting. A good rule of thumb is to make sure that the angle between the two legs of your anchor stays below 45 degrees. If bolts are placed farther apart, it might require using longer materials in your anchor to lessen the angle.
Another important principle of building your anchor is to inspect the gear you are trusting your system (and life) to. For traditional gear placements this idea is always assumed, but in sport climbing it is easy to become complacent and trust the bolts you are using to have no issues. A well placed bolt in the rock is often super strong, but there are many factors that can make these trusty protections not so secure. When using bolts for your anchor, you might want to inspect them and ask yourself a few questions. Are the bolts new and shiny, or old and rusty? Is the hardware modern steel created for climbing purposes or old, thin construction hardware with wimpy steel for a hanger? Is the rock in the vicinity of the bolt solid and secure or starting to crumble? Is the bolt solid in the rock or does it wiggle around, perhaps due to physical or chemical erosion within the rock? While most of the time these questions give the more confident answer, it is important to remember what you are clipping into for your anchor system, and yet another reason why redundancy in our anchors is so important.
Pre-Equalized
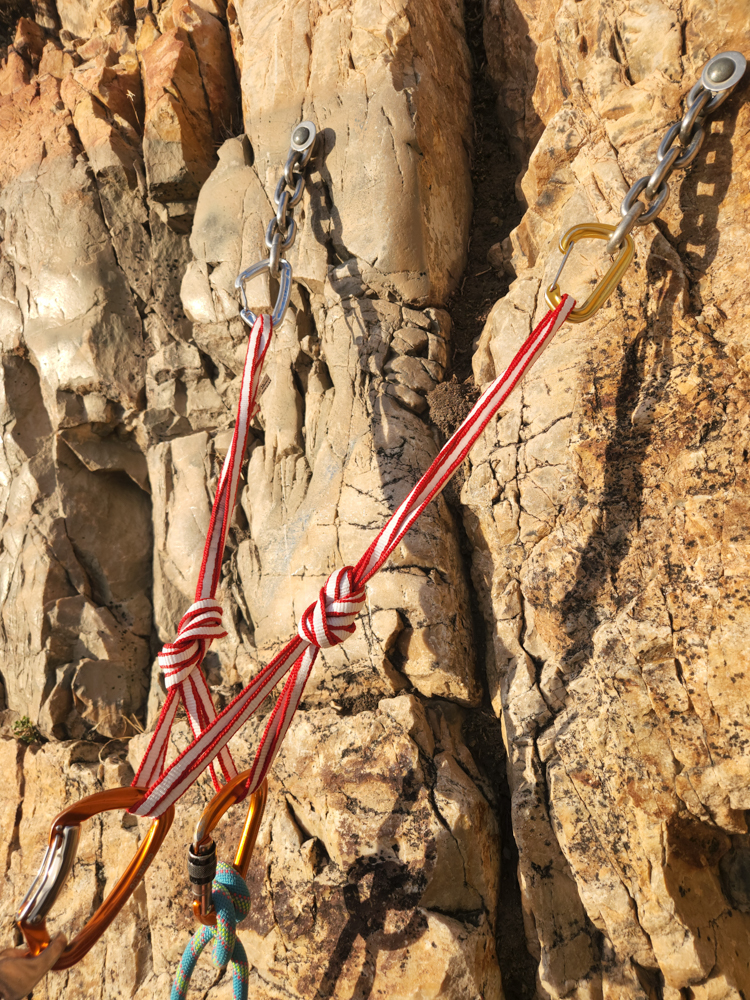
Let’s start our specific anchor styles out with one of the easiest to understand and evaluate, and probably my favorite one to utilize in most cases. The “pre-equalized” anchor is the true bread-and-butter of a climber’s toolbox, and starts with a sling clipped between our two connections to the wall (I’ll just call them bolts from now on for simplicity).
How to Tie a Pre-Equalized Anchor
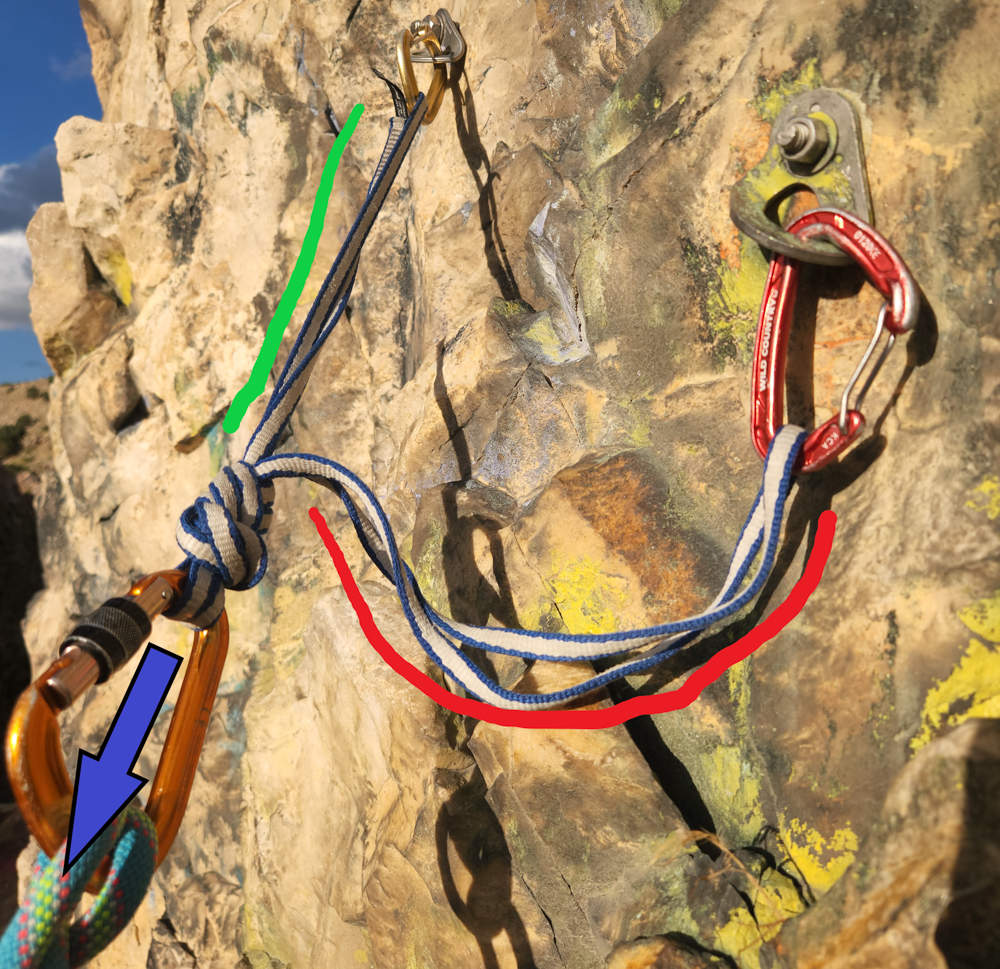
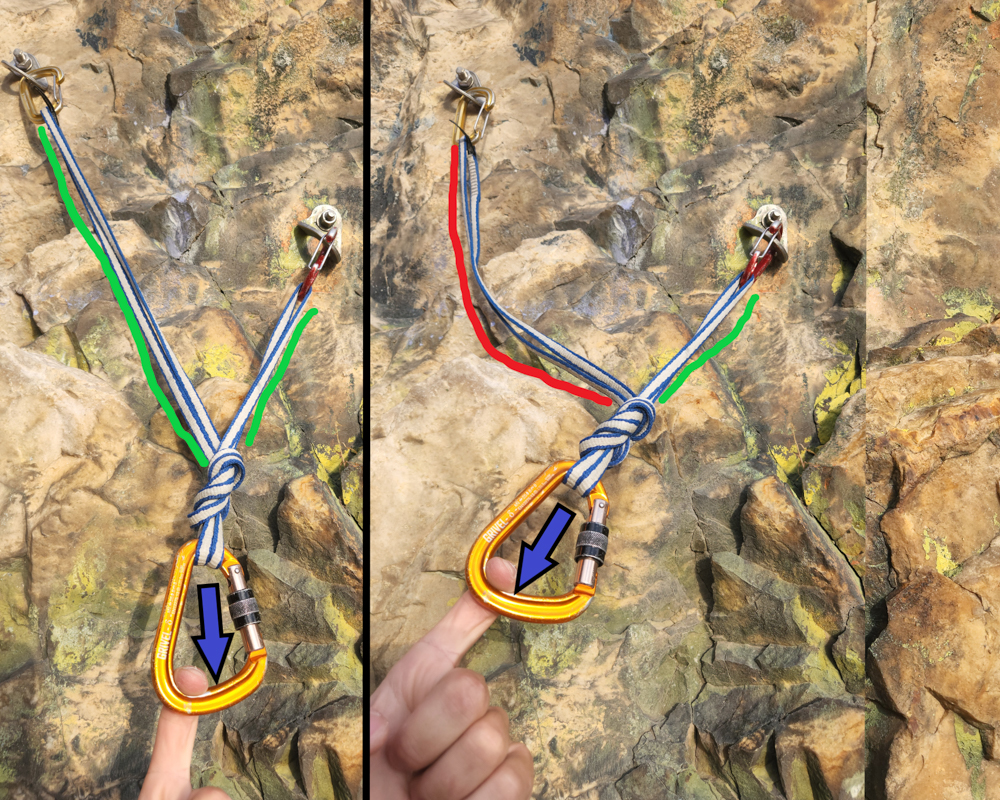
With our sling clipped between the bolts we find the middle hanging between them, grab a bight of that sling, and tie an overhand or a figure-eight with that bight of sling. It is important to remember that when tying this knot, we are removing the ability of a carabiner to slide along the sling and equalize the force between the two bolts, so we need to anticipate the direction of loading and tie the knot “in that direction” to create our equalization. This practice gives the setup it’s name of “pre-equalized”, as you are equalizing the two legs of the anchor towards a single direction which would take the form of the last piece of gear you clipped, or the direction the climber might fall after that last piece of protection is unclipped.
Once tied, you can clip carabiners into the “master-point” of the doubled bight of webbing coming out of the knot, or you can actually clip the “shelf” of the anchor, which requires attaching a carabiner between the two strands of each leg of the anchor. Either of these attachment points are Redundant between the two legs, Equalize the force between the two bolts, and limit the Extension should one of the legs fail.
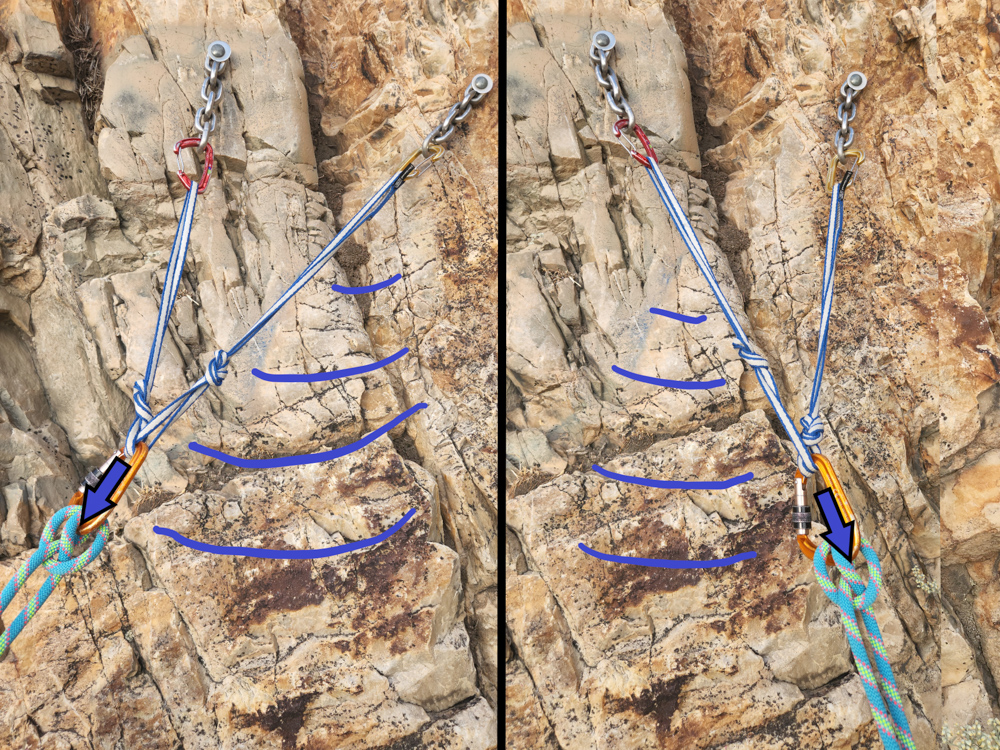
Some consideration could be required when deciding where to equalize this anchor type. For a pitch that climbs straight up to the anchor, the decision is easy: tie the knot so that the forces are evenly applied when pulled straight down, as that is the only direction that force could be applied. For a pitch that might wander a bit, or traverse into the anchor after climbing up, more critical thinking is required. When lowering or rappelling the rope and anchor system becomes the only point of reliance, so any anchor that will be lowered or rappelled off should be equalized in those respective directions.
Advantages and Disadvantages of Pre-Equalized Anchors
Now let’s talk about the specific advantages and disadvantages of this anchor style. The glaring disadvantage for this style is the fact that it is only equalized for one direction, a fact that requires more forethought on what direction forces might be applied in, and a flaw that the next anchor type more or less solves. While that might seem like a big issue, I find myself using this anchor type most often since it is quicker to tie, easier to untie, and allows for more organized belay systems with its multiple attachment points (master-point and shelf). The anchor is much quicker to tie and untie since the one large knot involved is tied on a bight or doubling of sling, and the extra material involved in the knot facilitates easier opening of the knot after it has been loaded. For this same reason, a figure-eight knot is better than a simple overhand knot since the figure-eight involves more material in its wraps, and is therefore easier to untie. If you are creating an anchor for one pitch and going to be removing it soon to remake for the next pitch, this is probably your go-to style.
Self-Equalizing
For those who want to show up to the sport crag, tie an anchor once, and use it for many different pitches the “self-equalizing” is the preferred option. Of course this anchor style isn’t limited to sport climbing or single pitch climbing and its properties can be incredibly useful in very complex systems, but it is most suitable for situations where the anchor is “re-used” for various pitches.
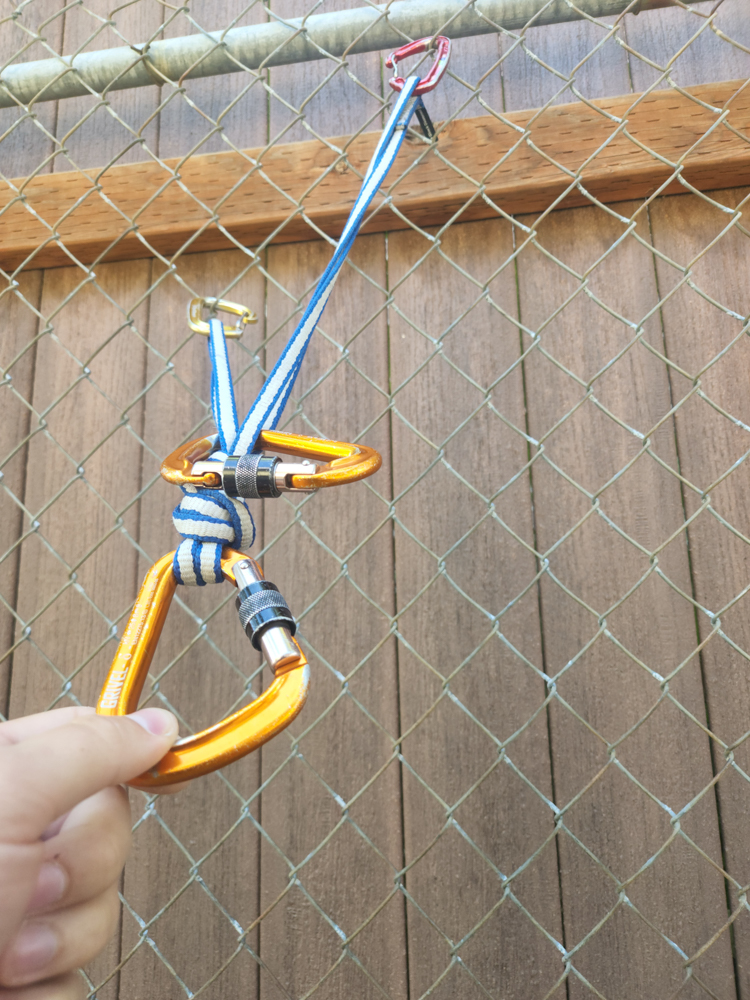
How to Tie a Self-Equalizing Anchor
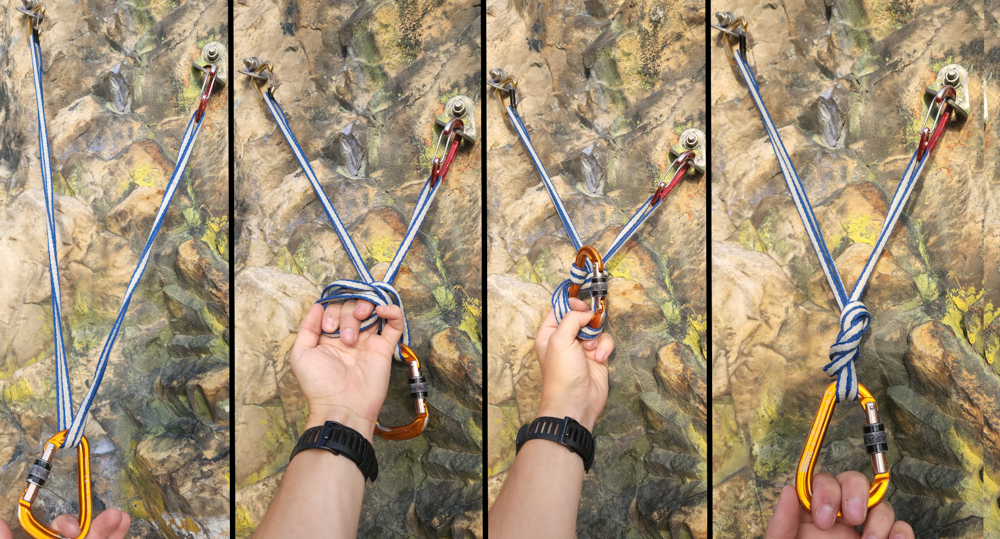
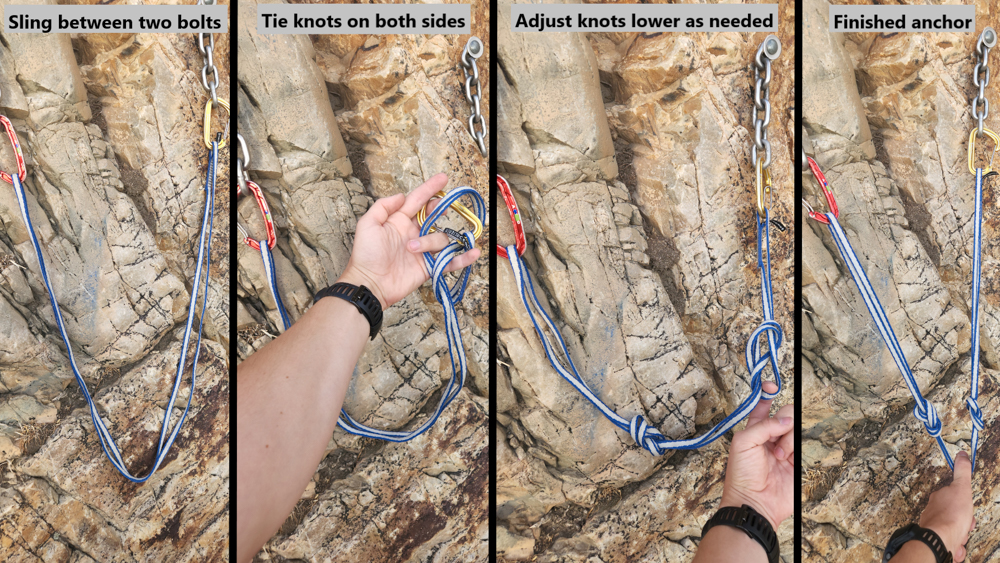
To tie this anchor, we start with a sling clipped between our two bolts as before, except instead of tying one knot on a bight in the middle, we remove one of the legs and tie two knots in-line along the length of the sling, both positioned near the middle of the sling. If the position of these knots isn’t ideal for your use when you first tie them you can easily reposition them before they have been tightened with a human’s weight on them. Now we can clip the carabiner into the “basket” created between the two knots, which allows the carabiner to slide back and forth and equalize between the two legs while the positioned knots limit the extension of that sliding action should one of the legs fail.
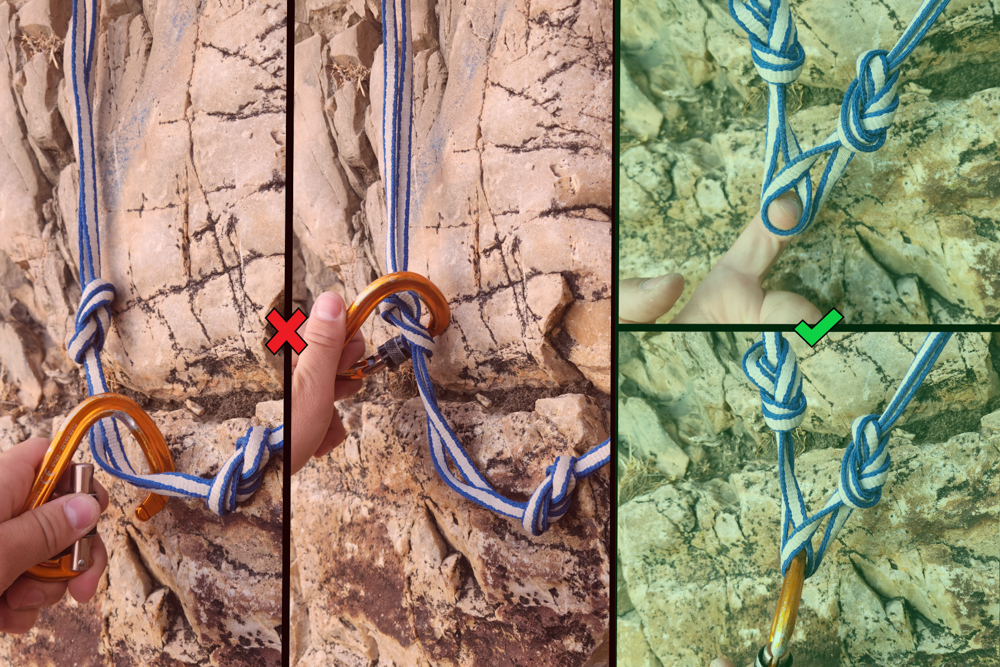
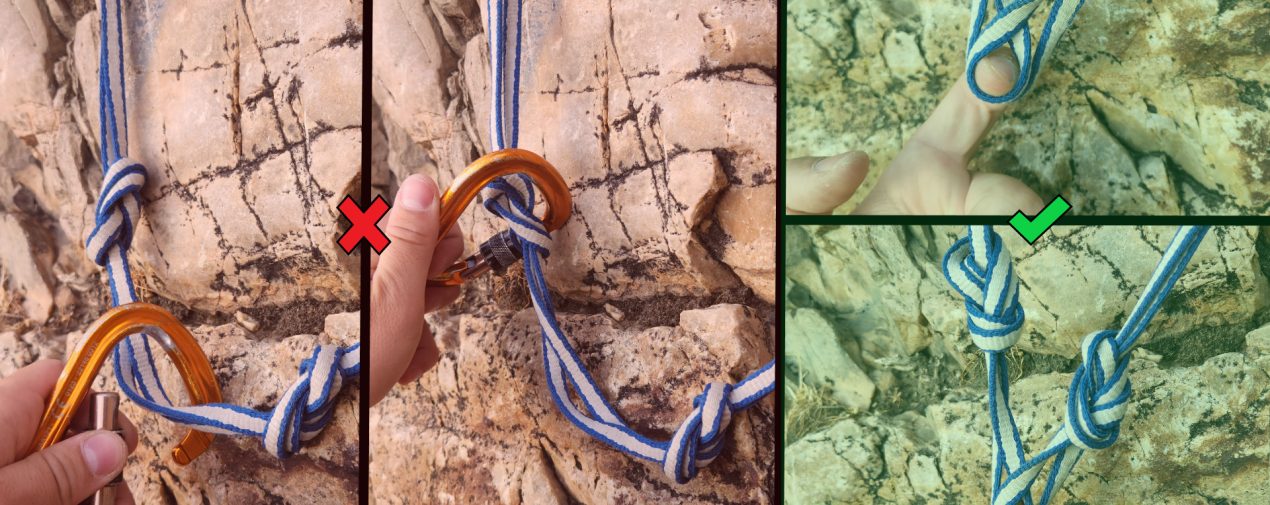
But wait, there is a twist!!! Or at least, there should be a twist. If you clip both of the strands of the basket created between the two knots, your carabiner would simply slide right over the knot and off the sling if one of the legs failed, essentially making the knots and the redundancy of the anchor useless. You could clip between the two strands of the basket, but unfortunately that simple solution isn’t good enough. It turns out that when knots are tied in our slings or webbing, it halves the strength of the material in question. This means that clipping just one strand of the basket isn’t quite strong enough for the safety margins required for trusting your life to it. So here comes the twist. To avoid either of these issues, we can actually clip both strands of the basket, but a twist needs to be created and clipped in one of the strands. This essentially clips the carabiner “between” the two strands, while also having both of them captured within the carabiner. The twist still allows the carabiner to slide, but creates the necessary redundancy and limited extension we need from the system.
Advantages and Disadvantages of Self-Equalizing Anchors
The self-equalizing anchor has some pretty amazing conveniences once tied, and it can often be re-used for pitch after pitch of climbing since it can adapt the direction of equalization within a broad range. One of the main reasons you might choose not to use this anchor is due to the fact that the two small knots that are tied for it can become very difficult to untie after a long day of climbing. Add to this some limitations in attachment points and there is some debate to be had as to when this anchor is most viable.
The Quad Anchor
Thankfully, the self-equalizing anchor does have a beefed-up sibling in the “Quad” anchor that solves or helps all of these problems. A quad anchor is tied in the exact same way as a self-equalizing, but with a doubled over sling or loop of cordelette. This means that instead of clipping both strands in the central basket and requiring a twist in one of them there are now four strands (hence the name) and you can clip either pair of these strands in the center for attachment points. This allows for more attachment options and bulkier knots that are easier to untie, however it does require more materials to bring along since you are doubling up the anchor.
The Final Word
To sum up, you hopefully now know the basic principles behind your anchors and how to tie them. Your next steps should be to get some gear and practice creating anchors in a safe environment. Sometimes local gyms have a few bolts on the ground where you can goof around with systems, or my personal favorite is a backyard chain-link fence since it allows numerous mock bolt locations to be experimented with. The main point is to get out and practice well before you are a hundred feet up a wall, sweating, and gripped out of your mind. You want the skills to be second nature and easy to remember so that they come as no issue when you need to utilize them in more stressful environments. With good knowledge and practice, you should feel confident in your skills to head out to the local crag and build solid anchors for you and your friends to climb on.
About the Gear Tester

Evan Watts
Evan grew up in the small hometown of Boring, Oregon, where he cut his teeth hiking and backpacking in the local Cascades. He now enjoys ice climbing, backcountry skiing, and trail running around in the Western States, and manages to fight off permanent employment despite an environmental engineering degree and perturbed parents.
- Evan Watts

- Evan Watts

- Evan Watts

- Evan Watts

- Evan Watts

- Evan Watts

- Evan Watts

- Evan Watts

- Evan Watts
- Evan Watts

- Evan Watts
- Evan Watts

- Evan Watts

- Evan Watts

- Evan Watts

- Evan Watts
- Evan Watts
- Evan Watts